Biome Tileset Packs Terrain Set Up Tutorial
About
The TERRAIN is the backbone of all Vectoraith tilesets. However, after updates and more updates, the terrain tileset complexity and layout can be confusing for first-time users. But don't worry, this page will help you set up the tileset correctly!
Applicable Products
- All Vectoraith Biome Tileset Pack series, starting from v.1.50 and up.
- This tutorial also partially applies for the free Farming Sim Tileset Pack terrain tilesets
Requirements
- Any game engine, including RPG Maker.
- Basic understanding of how that particular engine can handle tilesets ⚠️Please take this matter seriously, about 90% of FAQs that came in my Twitter/X/Bsky DMs are because of this particular engine understanding problem.
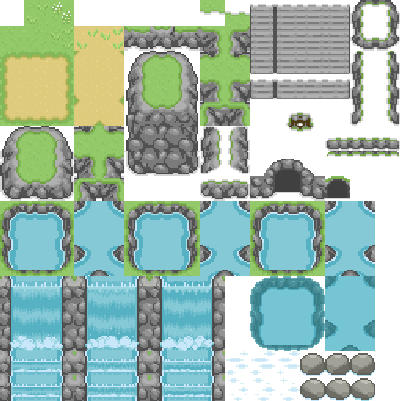
- The expanded terrain tileset of my packs. It is the file that always looks like this:
Tileset Layer Set Up
First step: get the layers ready in your engine.
The tilesets in my series are very packed to ensure modest tile count. A normal packed tileset will need more than 1 tile layer to set up the terrain. Ideally you need at least 4 layers for an organized terrain tiles. But theoretically, you only need to set 3.
The ideal tile layer should look like this (example only, engine used: Tiled):
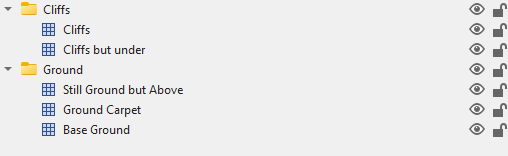
But again, theoretically you only need to set 3, because the 'Cliffs but Under' and the 'Ground Carpet' layer can be combined into one - at the cost of organization. The final set up is up to you.
I'll explain about the how to put those tiles in those layers later.
⚠️ In RPG Maker, you CAN'T set up/access layers unless you use RPG Maker XP or MZ. This is also the reason why in RPG Maker, slot for tile A5 exist. All Vectoraith also support tile A5, and I always include the A5 terrain version so non-XP and non-MZ users don't have to worry about that. This makes RPG Maker users with 2 tile layers left, which you can set-up nicely if you use the Terrain tile above in the the remaining tileset B-D.
Tileset Parts
Second step: Understanding the tileset parts.
The standard tileset layout in my tileset packs always contain specific parts.
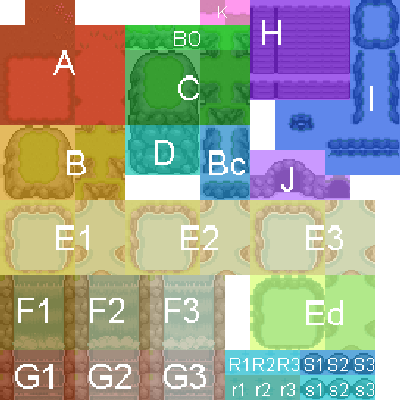
Based on the picture above, below are those parts and where you should put them in the tileset layer:
- [A] Flat ground. Always put this part in [Base Ground] layer.
- [B] Short Cliff. It has transparent "end-section" available as [Bc] parts. It also has [BO] "cliff connector" tiles to create seamless connection between [B] and [D] parts. Always put this part in the [Cliffs] layer.
- [C] High Cliff, upperside. Always put this part in the [Cliffs] layer.
- [D] High Cliff, cliffside. The mid section always goes in the [Cliffs] layer, but sometimes you will want the side sections to be put in the [Cliffs but Under] layer under several circumstances.
- [E] Water body. Always put this in [Base Ground] layer. These tiles are animated. The default animation sequence is E1-E2-E3-repeat. There is a Deep Water part [Ed]. The deep water part is not animated and must be put on [Ground Carpet] layer.
- [F] High Waterfall. Always put this in [Base Ground] layer. You must connect this part horizontally with High Cliff, Cliffside [D] , and vertically with [E] Water body for seamlessness. These tiles are animated. The default animation sequence is F1-F2-E3-repeat.
- [G] Tiered Waterfall. Always put this in [Base Ground] layer. You must connect this part horizontally with Short Cliff [B] and vertically with [E] Water body for seamlessness. These tiles are animated. The default animation sequence is G1-G2-G3-repeat.
- [H] Stairs. Put this part in the [Cliffs] layer. This part, especially the uppermost and lowermost section, should always has [Base Ground] layer directly visible underneath it.
- [I] Ledges. Always put this in [Base Ground] layer.
- [J] Cave Entrance. Put this part in the [Cliffs] layer, with respectable [B] or [D] part visible beneath it using [Cliffs but Under] layer.
- [K] Terrain Connector. This tile bridge two different terrain tiles when those two are separated by cliff {B] or [D]. Usable only when two different terrains are used.
- [R] Water Reflections. Always put this in [Ground Carpet] layer. These tiles are animated. The default animation sequence is R1-R2-R3-repeat, but you can assign randomized sequence if you want. There are two variants of this part, [R] and [r] .
- [S.]Aquatic Stone. Always put this in [Ground Carpet] layer. These tiles are animated. The default animation sequence is R1-R2-R3-repeat, but you can assign randomized sequence if you want. There are two variants of this part, [S] and [s].
Autotile
Optional: Setting up Autotile.
No, this step is NOT for RPG Maker users. This is for other game engines.
For engines/editors that support autotiles, you can set certain parts of the Terrain based on 2x2 autotile rule!
Just set the terrain region up like below. Always follow the principle of "same region = same color" when setting them up.
For the part [A], you may notice that it has multiple tiles in full red and green color. You can give "probability" value for those tiles so they will randomly spawn in certain rate when autotiling, creating a non-repetitive texture in the process. ⚠️For some, this is an advanced technique. Consult your engine tutorial on how to do this!
Keep in mind that "same region = same color". That means you need to delete the center section of part [B] and [C] after autotiling them to keep everything in the [Base Ground] layer visible.
Tileset Collision
Third step: Setting up collision.
The Vectoraith tileset packs are designed with most simple collision in mind.
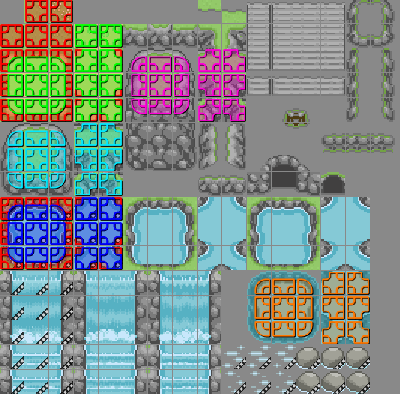
Below are the recommended collision setting.
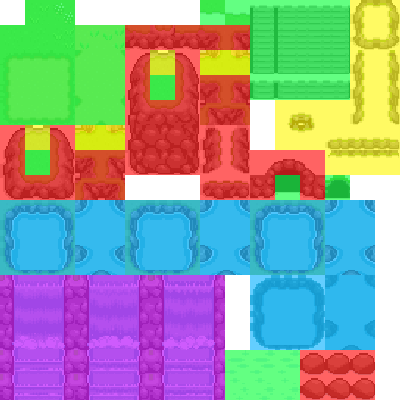
- [Red] Full collision. These terrains should NOT be passable.
- [Yellow] Partial collision. These terrains should NOT be passable ONLY on the direction the corresponding edge is facing. Pay attention to where their edge is!
- [Green] No collision. This terrain should NOT be passable.
- [Blue] Water terrain. Normally this terrain should NOT be passable, but you better program it according how player should interact with water in your game.
- [Purple] Waterfall terrain. Normally these terrains should NOT be passable, and should follow the [Blue] collision programming. However, you better program it according to how player should interact with waterfall in your game.
Last Step: Drawing the Tilemap
With those rules followed, now your tileset are set up for placement!
1. Put the basic grass tile (the second lower tile in the left cornermost) on the tilemap. ⚠️Always do this and never skip it!
2. Draw the rest of the terrain based on their layer!
Example (Engine: Tiled)
That's all, happy tilemapping!
Leave a comment
Log in with itch.io to leave a comment.